
0011
TM 1-4920-924-13&P
AVIATION SHOP EQUIPMENT CONTACT MAINTENANCE (AV SECM) SYSTEM MAINTENANCE
INSTRUCTIONS FOR CURBSIDE ASSEMBLY - (CONTINUED)
Fourth Shelf
2
1
3
4
5
6
24
25
7
8
9
23
10
22
21
20
19
18
17
16
11
15
12
13
14
SECM0012
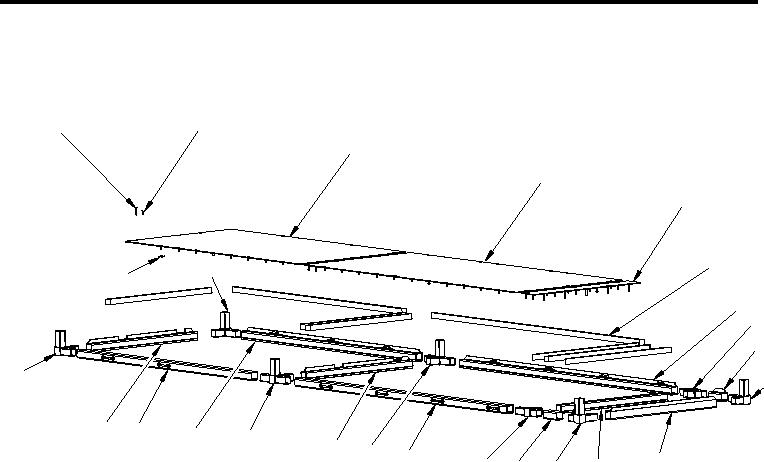
Figure 8. Curbside Assembly Fourth Shelf
1.
Install two corner castings (Figure 8, Item 23 and 24) into aluminum rail (Figure 8, Item 22) ensuring corner
casting does not block mounting hole of a minimum rail (Figure 8, Item 22).
2.
Install two corner castings (Figure 8, Item 17 and 19) into aluminum rail (Figure 8, Item 18).
3.
Install two corner castings (Figure 8, Item 23 and 24) into aluminum rails (Figure 8, Item 20 and 21).
4.
Install two corner castings (Figure 8, Item 17 and 19) into aluminum rails (Figure 8, Item 20 and 21).
5.
Install two corner castings (Figure 8, Item 17 and 19) into aluminum rails (Figure 8, Item 7 and 16).
6.
Install two corner castings (Figure 8, Item 8 and 15) into aluminum rail (Figure 8, Item 12).
7.
Install two corner castings (Figure 8, Item 8 and 15) into aluminum rails (Figure 8, Item 7 and 16).
8.
Install two corner castings (Figure 8, Item 8 and 15) into aluminum rails (Figure 8, Item 9 and 14).
9.
Install two corner castings (Figure 8, Item 10 and 13) into aluminum rail (Figure 8, Item 11).
10.
Install two corner castings (Figure 8, Item 10 and 13) into aluminum rails (Figure 8, Item 9 and 14).
11.
Install eight shims (Figure 8, Item 6) and three support plates (Figure 8, Item 3, 4 and 5).
12.
If aluminum rails (Figure 8, Item 7, 11, 12, 18, 20 or 22) were replaced, follow procedures listed in Install
Helical.
13.
On aluminum rails (Figure 8, Item 7, 11, 12, 18, 20 or 22) install ifty 10-32 X 1.38 inch countersunk screws
(Figure 8, Item 1).
14.
On aluminum rails (Figure 8, Item 16 and 21) install twenty 10-32 X 0.63 inch countersunk screws
(Figure 8, Item 2) and twenty speed nuts (Figure 8, Item 25) securing support plates (Figure 8, Item 3, 4
and 5).
001111

