TM 9-243
READING A METRIC MICROMETER
The same principle is applied in reading the metric
graduated micrometer, but the following changes in
graduations are used:
The pitch of the micrometer screw is 0.05 mm. One
revolution of the spindle advances or withdraws the
screw a distance equal to 0.5 mm.
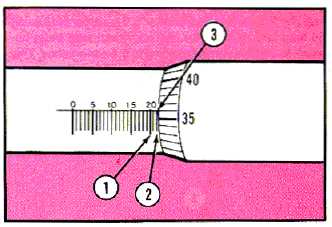
The barrel (1) is graduated in millimeters from 0 to 25.
It takes two revolutions of the spindle to move the barrel
1 mm.
The thimble (2) is graduated in 50 divisions with every
fifth line being numbered.
Rotating the thimble from one graduation to the next
moves the spindle 1/50 of 0.5 mm, or 1/100 mm. Two
graduations equal 2/100 mm, and so forth.
TO READ MEASUREMENT AS SHOWN ABOVE:
Read highest figure
visible on barrel (1) ...............................20 = 20.0 mm
Number of lines visible
between the No. 20 and
thimble edge (2) ....................................... 2 = 2.0 mm
The line on the thimble
that coincides with or
has passed the
revolution or long line
in the barrel (3) .........................36 = 36/100 (.36) mm
NOTE
Remember that 1 revolution is 0.5
mm. It takes 2 revolutions to move 1
mm.
Measurement reading ...................... TOTAL 22.36 mm
CARE OF MICROMETERS
1.
Coat metal parts of all micrometers with a light
coat of oil to prevent rust.
2.
Store
micrometers
in
separate
containers
provided by manufacturer.
3.
Keep
graduations
and
markings
on
all
micrometers clean and legible.
4.
Do not drop any micrometer. Small nicks or
scratches can cause inaccurate measurements.
7-6


