
TM 1-4920-500-13&P
0031 00
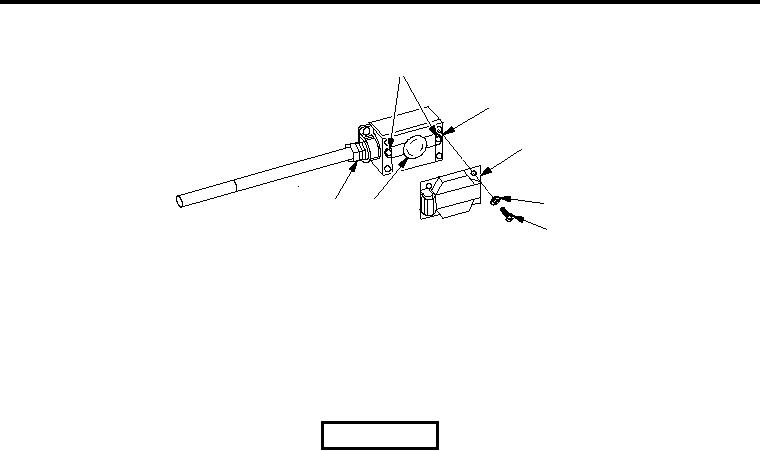
240V OUTLET BOX ASSEMBLY
1
2
3
4
7
6
5
SSAE150
Inspect
1. Inspect 240V outlet box assembly (2) and cover (3) for damage.
2. Replace 240V outlet box assembly (2) and/or cover (3) if damage is detected.
Replace
WARNING
HIGH VOLTAGE exists in electrical system of shop. All electrical inspections,
repairs, or replacements will be performed with power OFF and only by a
qualified electrician. Serious shock hazards exist which could result in INJURY
OR EVEN DEATH to personnel.
1. Move main circuit breaker to OFF position.
2. Remove four screws (5) and four washers (4) attaching cover (3) to 240V outlet box assembly (2) (type of
screw head may vary).
3. Remove two screws (1) attaching 240V receptacle (6) to outlet box (2).
4. Pull 240V receptacle (6) out of outlet box (2).
5. Loosen wires that are connected to 240V receptacle (6) and disconnect. Set aside for reinstallation.
6. Remove lock nut on box connector (7) located inside outlet box (2).
7. Remove screws attaching outlet box (2) to wall and remove damaged outlet box (2).
8. Place new outlet box (2) onto box connector (7) and start lock nut.
9. Align outlet box (2) up with mounting holes and install screws.
10. Tighten lock nut on box connector (7).
11. Connect wires to 240V receptacle (6) and tighten screws.
12. Mount 240V receptacle (6) to outlet box (2) with two screws (1).
13. Install cover (3) onto outlet box (2).
14. Restore power to outlet box (2) by moving 20 AMP and main circuit breaker to ON position.