TM 9-243
USING THE PORTABLE ELECTRIC DRILL
WARNING
BEFORE USING ANY ELECTRICAL
TOOL, ALWAYS MAKE CERTAIN THE
TOOL IS EQUIPPED WITH PROPER
GROUNDING FEATURES. FAILURE
TO HAVE PROPER GROUNDING CAN
RESULT IN SERIOUS SHOCK.
WARNING
ALWAYS
WEAR
PROPER
EYE
PROTECTION
WHEN
WORKING
WHERE FLYING PARTICLES MAY
CAUSE EYE INJURY.
1
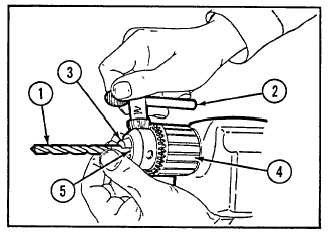
Select the proper bit (1) required for the task.
NOTE
To turn chuck key in either direction
a firm grasp of the chuck is required
2
Fit the chuck key (2) into the side adjusting hole
between jaws (3) and chuck (4) and turn the key
counterclockwise until the chuck opens enough to
admit the bit shank (5).
3
Insert the bit and center the shank in the chuck jaws.
Tighten jaws securely by turning the chuck key
clockwise.
4
Remove chuck key and store where key will not get
lost.
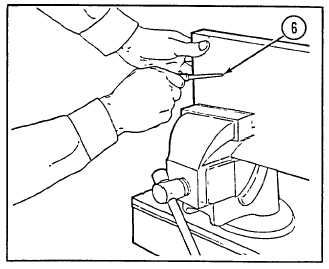
5
Before drilling, make sure that the work is stationary
or firmly secured.
6
Using a punch or awl, make a small prick point (6) in
the spot where the hole will be made. (This will
prevent the drill bit from bouncing or slipping away
from the spot where the hole is to be drilled.)
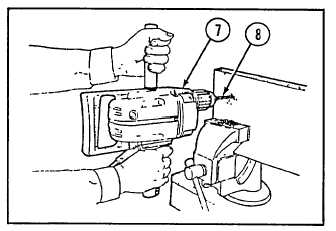
7
Connect electric drill (7) to power source. Place the
drill bit on the marked spot and depress trigger
switch. Begin drilling, exerting firm but even
pressure to keep the bit cutting.
8
Withdraw the bit frequently from the work to clean
chips from the bit flutes (8) and to allow the bit to
cool.
9
Ease up on the drill pressure as the bit approaches
the other side of the work surface.
10 After hole is completed, carefully withdraw rotating
drill bit to prevent binding or breaking. Release
trigger switch.
52-5