TM 9-243
USING THE PORTABLE ELECTRIC DRILL – CONTINUED
drilling thin sheet stock, back up the stock with a piece of
wood to prevent the stock from being bent out of shape.
When the location of the desired hole is selected, it
should be center punched. This will aid the drill in
starting to cut and will prevent it from wandering. Turn
the drill chuck a few times by hand before turning on the
power to insure that the drill bit is properly installed.
Keep the drill cutting at all times while in contact with the
metal. A steady and uniform pressure should be applied
at all times to insure continuous cutting. The drill will
become excessively hot if permitted to turn on the metal
without cutting When the drill point is about ready to
break through the metal, ease up on the pressure. This
point in noted by the difference in pressure and cutting
feel. Don't permit the drill to project through the hole.
When the hole is complete, remove the drill immediately
by pulling it back as it continues to turn in a clockwise
direction.
A drilled hole will often have rough edges or burrs on
both surfaces. To remove these, select a drill bit twice
the size of the hole and hand rotate the point against the
burrs. When possible insert the drill bit in a file handle
when performing this job. Be careful not to ,burr the hole
too much. The hole should be a true cylinder and not
countersunk.
When the hole to be drilled is large, a pilot or guide hole
should be drilled first. This small hole will help guide the
larger drill and will also prevent the larger drill from
wandering across the metal.
REMOVING RIVETS
To remove a defective rivet or disassemble a unit joined
by rivets, use the following procedure:
1.
Select a twist drill equal in size or smaller than the
rivet shank.
2.
Drill into the exact center of the head to a depth
equal to the head thickness.
3.
Insert a pin punch in the hole and pry off the rivet
head.
4.
Drive the rivet shank out of the metal with a pin
punch.
DRILLING SAFETY PRACTICES
A misused drill can result in personal injury. When
performing a drilling operation, the following safety
precautions should be adhered to:
1.
Be sure that the drill selected is of the proper size,
free of rust, and that the flutes are clean.
2.
Keep the drill bit tight in the chuck.
3.
Be sure that the drill motor switch is off when
inserting the line cord into the receptacle.
4.
Never use a bent drill.
5.
Be certain that the cutting edges and point are not
dulled.
6.
Be sure that the metal stock is properly secured.
7. Always wear safety glasses.
8.
Turn off the drill motor before laying it down
COUNTERSINKS
Countersinks are used to bevel the end of drilled holes
to fit countersink type screws and bolts. The countersink
stocked at the sites is equipped with a micrometer
adjustment (adjustable to .001 inch) and a stop pin that
prevents the countersink from cutting deeper than the
desired depth. The micrometer adjustment of this tool is
calibrated .
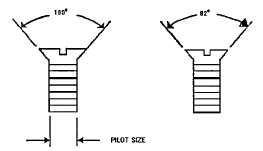
The countersink is designed to hold a variety of sizes of
cutting heads, both in 820 and 1000 point angles. The
reason for the two different joint angles is that, at a site,
screw and bolts are available with two different types of
countersunk heads. The countersunk cutting heads are
also designated according to the size of the hole being
countersunk, which is, in effect, the minor diameter of
the countersink cuter pilot. The purpose of the pilot is to
insure that the countersunk hole is concentric with the
screw hole.
Change 3 52-5.1