TM 1-4920-440-13&P
0033 00
REMOVING CEILING LIGHTS FROM HINGED ROOF
WARNING
Ensure main circuit breaker and all other circuit breakers in circuit breaker panel are in
the OFF position. Serious shock hazards exist which could result in INJURY OR EVEN
DEATH to personnel.
Inhalation of phosphorous dust could cause SERIOUS INJURY to personnel. In an event
of lamp breakage, care must be taken in removal of broken glass fragments and white
phosphorous dust that may be dispersed within ixture.
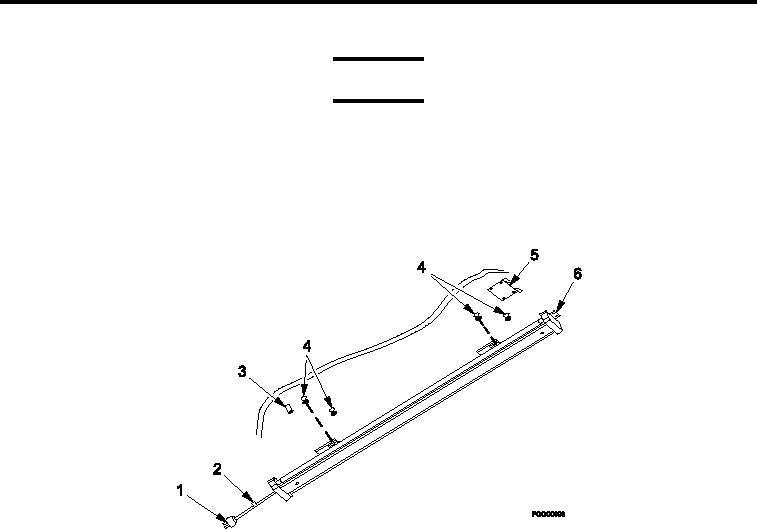
Figure 3.
Repositioning Ceiling Lights.
1.
Twist power cable (Figure 3, Item 1) one-quarter turn counterclockwise to unlock and then remove from
connector.
2.
Press and hold plunger lock (Figure 3, Item 3).
3.
Move entire light ixture (Figure 3, Item 6) lengthwise away from power cable (Figure 3, Item 1) to disengage
light from four captive studs (Figure 3, Item 4) and light storage bracket (Figure 3, Item 5) in hinged roof.
4.
Move light ixture (Figure 3, Item 6) into ixed roof section and rotate 180 degrees. Mate with four captive
studs (Figure 3, Item 4) in ixed roof.
5.
Secure light ixture (Figure 3, Item 6) by moving until plunger lock (Figure 3, Item 3) engages.
6.
Place power cable (Figure 3, Item 1) into storage clip (Figure 3, Item 2) on ceiling.
7.
Repeat Steps 1 through 6 for two remaining ceiling lights.
END OF WORK PACKAGE
0033 00-3/4 blank

