
TM 9-4940-421-14
(f) Inspect the bearing cones and cups. Or-
dinarily they should be in good condition. Replace
defective oil seals.
(g) Inspect the hardware for bad threads, rust,
or damage incurred during removal. If the screws have
bad threads, replace the screws. Repair the mounting
holes by running a tap into them. Replace any other
defective hardware.
(h) Replace the main bearing plate gaskets.
(2) Camshaft
(a) Wash the camshaft and tappets with clean-
ing solvent and dry thoroughly (app D).
(b) Inspect the camshaft for alinement, scoring,
and roughness on the cams and journals. Repair any
slight roughness, or replace a badly scored camshaft.
(c) Measure the camshaft journals and cams.
Replace the camshaft if either the journals or cams are
worn beyond the limits of allowable wear. The no. 1
camshaft journal should be between 1.8725 and 1.8730
inches. The smaller no. 2 journal should be between
1.2475 and 1.2480 inches.
(d) Measure the camshaft journals and the
camshaft bores in the crankcase. If the difference in
diameters exceeds 0.0035 inch, and the camshaft is
within the wear tolerances, replace the crankcase. If
the difference in diameter is less than 0.002 inch, ream
and hone the crankshaft bores.
e. Reassembly and Installation.
(1) Camshaft.
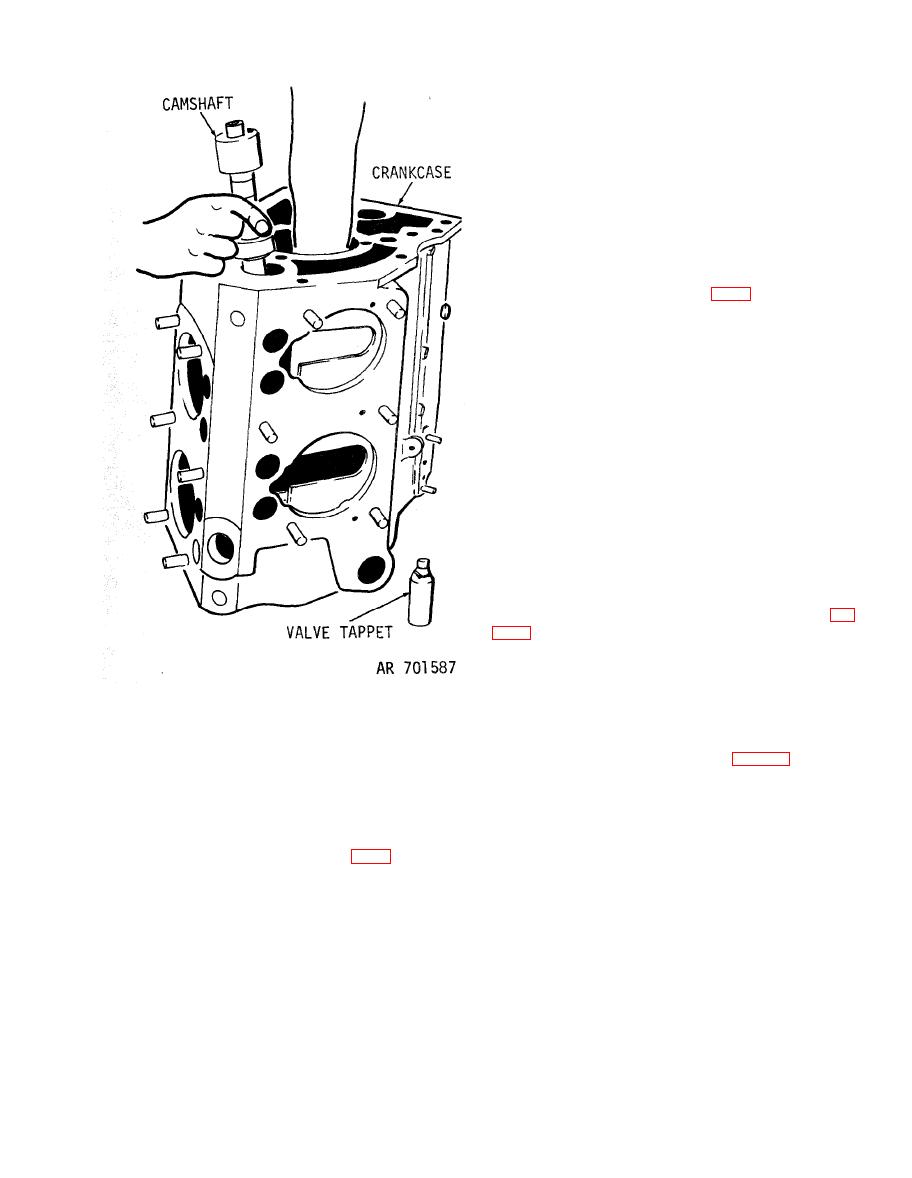
(a) Apply a thin coat of oil to the tappets (5, fig
crankcase. Place a prop under the tappets so as to clear
the camshaft when it is installed.
(b) Apply a thin coat of oil to the camshaft (4),
and install it in the crankcase. Install a new expansion
plug. Remove the props from under the tappets.
(3) With a sharp chisel, punch a hole in the expan-
(2) Crankshaft.
sion plug installed in the rear camshaft bore in the
(a) Press the bearings (6, fig 6-14) on the
crankcase. Pry the expansion plug out with a
crankshaft.
screwdriver.
(b) Install the key (17) in the crankshaft key-
d. Cleaning, Inspection and Repair.
way. Aline the keyway in the crankshaft gear (20) with
(1) Crankshaft.
the installed key, and press the gear on the shaft.
(a) Wash the removed crankshaft parts in
(c) Assemble the oil seal in its retainer and
cleaning solvent and dry thoroughly (app D).
press the assembly into the main bearing plate with
(b) Inspect the connecting rod journals on the
the retainer facing toward the exterior face of the
crankshaft for scoring. Hone the journals to remove
plate.
any slight scoring, or replace a defective crankshaft.
(d) Press the bearing into the main bearing
(c) Measure the journals. Replace a crankshaft
plate.
that is worn more than 0.002 inch. The diameter of the
(e) Apply a coat of bearing grease to the roller
crankshaft should be between 2.125 and 2.126 inches.
(d) Check the main bearing plate and bearing
retainer plate for cracks, breaks, or burrs on the mat-
(f) Carefully install the crankshaft into the
ing surface. File away any burrs. Replace a cracked or
crankcase through the rear opening of the crankcase.
broken plate.
Engage the crankshaft gear in the gear train so that
(e) Check the rear oil seal for damage or indica-
the timing mark on the camshaft gear alines with the
tion of wear. Replace a defective oil seal.
timing mark of the crankshaft gear.
