(15)
Rotate crankshaft positioning the first stage
piston at top dead center. Unscrew and remove
the four locknuts (56) and carefully lift first stage
head and cylinder group (55) away from
crankcase (127) far enough to expose piston pin
retaining rings (59). Remove the retaining rings
(59) and piston pin from piston and the
connecting rod. Keep piston pin and piston with
first stage cylinder and piston group. Remove
cylinder gasket (58). Studs (57) need not be
removed from crankcase unless damaged and
require replacement.
(16)
Rotate crankshaft positioning the second stage
piston top dead center. Unscrew and remove
four locknuts (61) and carefully lift second stage
head and cylinder group (60) away from
crankcase (127) far enough to expose piston pin
retaining ring (64). Remove the retaining rings
(64) and the piston pin from piston and
connecting rod. Keep piston pin and piston with
second stage cylinder and piston group.
Remove cylinder gasket (63)
Studs (62) need
not be removed from crankcase unless
damaged and require replacement.
(17)
crankshaft positioning the third stage piston top
dead center. Unscrew and remove four locknuts
(66) and carefully lift third stage head and
cylinder group (65) away from crankcase (127)
far enough to expose piston pin retaining rings
(69). Remove the retaining rings (69) and the
piston pin from the piston and connecting rod.
Keep piston pin and piston with third stage
cylinder and piston group. Remove cylinder
gasket (68). Studs (67) need not be removed
from crankcase unless damaged and require
replacement.
(18)
Rotate crankshaft positioning the fourth stage
piston top dead center. Unscrew and remove
four locknuts (71) and carefully lift fourth stage
head and cylinder group (70) off crankcase
(127). Remove cylinder gasket (73). Studs (72)
need not be removed from crankcase unless
damaged and need replacement. Remove
piston pin retaining rings (74) and piston pin from
piston and connecting rod.
(19)
Remove six cap screws (77), lock washers (78)
and drive ring (76). Remove three cap screws
(80), lock washers (81) and flywheel (79). Dowel
’pin (82) need not be removed unless
replacement is necessary. Remove flywheel
gasket (83).
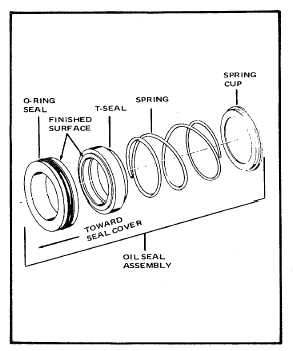
NOTE
Pay particular attention to disassembly
sequence of oil seal (88) from crank (118).
(See Figure 6-6.) Reference sequence for
reassembly purposes. Care should be taken
not to mar T-seal surface and the o-ring seal
finished surface.
(20)
Remove four locknuts (85) and sealing washers
(86) and remove the oil seal cover (84).
Remove o-ring (87), oil seal (88) and oil pump
outer cover (89).
(21)
Remove cap screws (91, 93) and lock washers
(92, 94), separate and remove end cover
assembly (90) and remove gasket (95).
Disassemble cover bushings (96) and o-ring (97)
from end cover (90) only when replacement is
necessary.
(22)
Remove the four oil pump blades (99), The oil
pump rotor (98) and rotor key (100) from
crankshaft (118). Remove the oil pump inner
cover (101) and four cover studs (102). Press oil
seal (103) out of cover (101).
Figure 6-6. Oil Seal, Crankshaft
6-19